Kia Cee'd: Rear Seat / Rear Seat Cushion Cover Repair procedures
[5Door, Waggon]
[LH]
| • |
Put on gloves to protect your hands.
|
|
| • |
Use a plastic panel removal tool to remove interior trim pieces
to protect from marring the surface.
|
| • |
Take care not to bend or scratch the trim and panels.
|
|
| 1. |
Remove the rear seat cushion assembly [LH].
(Refer to Rear Seat - "Rear Seat Assembly")
|
| 2. |
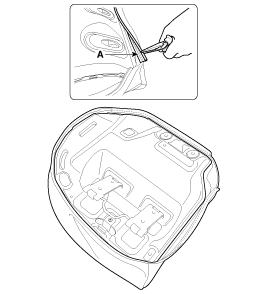
Disconnect the rear seat cushion cover protector (A).
|
| 3. |
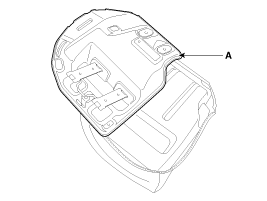
Remove the rear seat cushion frame (A).
|
| 4. |
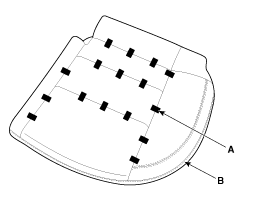
After removing the hog-ring clips (A) on the rear of seat cushion and
remove the rear seat cushion cover (B).
|
| 5. |
Install in the reverse order of removal.
| •
|
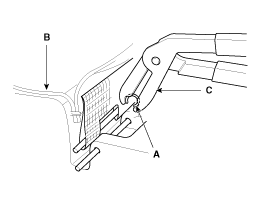
To prevent wrinkles, make sure the material is stretched
evenly over the cover (B) before securing the hog-ring
clips (A).
|
| •
|
Replace the hog-ring clips with new ones using special
tool [C (09880-4F000)].
|
|
|
[5Door, Waggon]
[RH]
| • |
Put on gloves to protect your hands.
|
|
| • |
Use a plastic panel removal tool to remove interior trim pieces
to protect from marring the surface.
|
| • |
Take care not to bend or scratch the trim and panels.
|
|
| 1. |
Remove the rear seat cushion assembly [RH].
(Refer to Rear Seat - "Rear Seat Assembly")
|
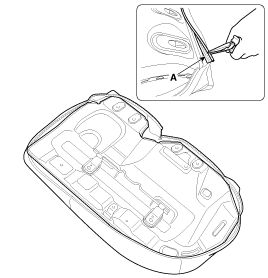
| 2. |
Disconnect the rear seat cushion cover protector (A).
|
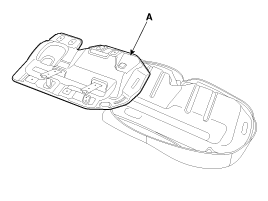
| 3. |
Remove the rear seat cushion frame (A).
|
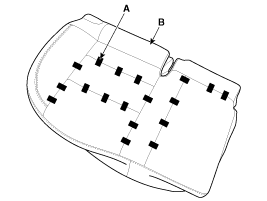
| 4. |
After removing the hog-ring clips (A) on the rear of seat cushion and
remove the rear seat cushion cover (B).
|
| 5. |
Install in the reverse order of removal.
| •
|
To prevent wrinkles, make sure the material is stretched
evenly over the cover (B) before securing the hog-ring
clips (A).
|
| •
|
Replace the hog-ring clips with new ones using special
tool [C (09880-4F000)].
|
|

|
[3Door]
| • |
Put on gloves to protect your hands.
|
|
| • |
Use a plastic panel removal tool to remove interior trim pieces
to protect from marring the surface.
|
| • |
Take care not to bend or scratch the trim and panels.
|
|
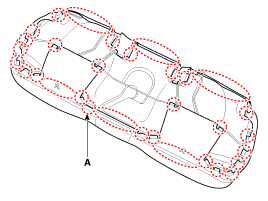
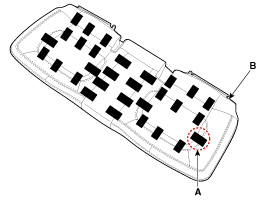
| 1. |
Remove the j hook (A).
|
| 2. |
After removing the hog-ring clips (A) on the rear of seat cushion and
remove the rear seat cushion cover (B).
|
| 3. |
Install in the reverse order of removal.
| •
|
To prevent wrinkles, make sure the material is stretched
evenly over the cover (B) before securing the hog-ring
clips (A).
|
| •
|
Replace the hog-ring clips with new ones using special
tool [C (09880-4F000)].
|
|

|
Component Location
1. Rear seat cushion cover [LH]
2. Rear seat cushion cover [RH]
...
Component Location
[5Door, Waggon only]
1. Rear back armrest
...
Kia Cee'd JD Service Manual: Description and operation
Description
Block Diagram
LDWS is composed of below units
No
Item
Function
Position
1
LDWS UNIT
1)
Lane Departure Warning System (LDWS) : Detects d ...
Kia Cee'd JD Owners Manual: Cool box
You can keep beverage cans or other
items cool in the glove box.
1. Turn on the air conditioning. The temperature
of the cool box will change
according to the temperature of air
conditioning.
2. Turn the knob to the open position.
3. When the cool box is not used, turn the
knob to the ...
 Rear Seat Cushion Cover Components and components location
 Rear Back Armrest Components and components location


