Kia Cee'd: Audio System / Steering wheel audio controls
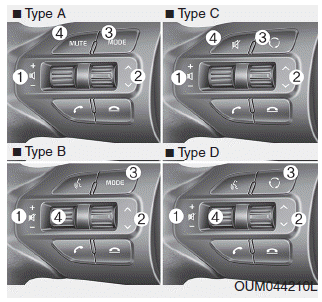
The steering wheel may incorporate audio control buttons.
CAUTION
Do not operate audio remote control buttons simultaneously.
VOLUME (+/-) (1)
- Press the lever upward (+) to increase the volume.
- Press the lever downward (-) to decrease the volume.
SEEK/PRESET ( /
/ )
(2)
)
(2)
The SEEK/PRESET lever has different functions based on the system mode. For the following functions the lever should be pressed for 0.8 seconds or more.
RADIO mode
It will function as the AUTO SEEK select button.
CD/USB/ iPod® mode
It will function as the FF/REW button. If the SEEK/PRESET button is pressed for less than 0.8 seconds, it will work as follows in each mode.
RADIO mode
It will function as the PRESET STATION buttons.
CD/USB/ iPod® mode
It will function as TRACK UP/DOWN button.
MODE ( ) (3)
) (3)
Press the button to change audio source.
FM ➟ AM ➟ CD ➟ USB/iPod® ➟ AUX ➟ MY MUSIC ➟ Bluetooth® Wireless Technology audio
MUTE ( ) (4, if equipped)
- Press the button to mute the sound.
- Press the button to turn off the microphone during a telephone call.
Detailed information for audio control buttons are described in the following pages in this section.
 Shark fin antenna
The shark fin antenna will receive the
transmit data.
CAUTION - Pole type
antenna
Before entering a place with a
low height clearance or a car
wash, remove the antenna
pole by rotati ...
 AUX, USB and iPod® port
You can use an aux port to connect
audio devices and an USB port to
plug in an USB and also an iPod®
port to plug in an iPod®.
✽ NOTICE
When using a portable audio device
connected to ...
Other information:
Kia Cee'd JD Service Manual: Ignition Coil Specifications
Specification
Item
Specification
Primary Coil Resistance (Ω)
0.75 ± 15% [20°C (68°F)]
Secondary Coil Resistance (kΩ)
5.9 [20°C (68°F)]
...
Kia Cee'd JD Owners Manual: Headlight (Low, Non-HID Type)
Follow the steps 1 to 7 from the previous
page.
8. Remove the cover by turning it counterclockwise.
9. Remove the socket from the assembly
by turning the socket counterclockwise
until the tabs on the socket align with
the slots on the assembly.
10. Pull the bulb out of the socket.
11. ...