Kia Cee'd: Windshield Wiper/Washer / Windshield Wiper-Washer Switch Repair procedures
Kia Cee'd JD Service Manual / Body Electrical System / Windshield Wiper/Washer / Windshield Wiper-Washer Switch Repair procedures
| Inspection |
Check for continuity between the terminals while operating the wiper and washer
switch. If it is not normal condition, replace wiper and wiper switch.
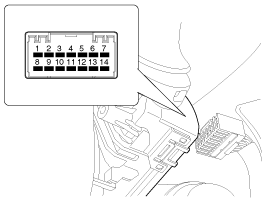
Wiper Switch
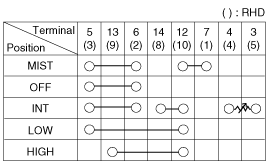
Washer Switch

Rear Wiper Switch
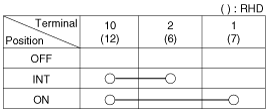
Rear Washer Switch

| Removal |
| 1. |
Remove the steering column shroud lower / upper panel.
(Refer to Body - "Steering Column Shroud Panel")
|
| 2. |
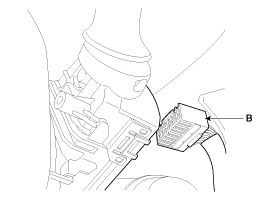
Disconnect the connector (A).
|
| 3. |
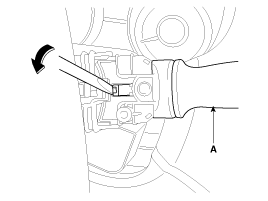
If it is necessary to remove. The wiper & washer switch (A) only, release
the lock of wiper switch using tool without removing the steering wheel
and the clock spring.
|
| 4. |
Remove the steering wheel.
(Refer to Steering System - "Steering Wheel")
|
| 5. |
Remove the clock spring.
(Refer to Restraint - "Driver Airbag (DAB) and Clock Spring")
|
| 6. |
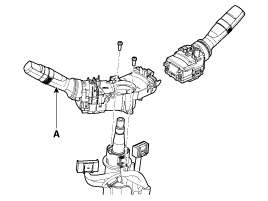
Remove the multifunction switch assembly (A) after loosening 2 screws.
|
| Installation |
| 1. |
Install the multifunction switch after connecting the connector.
|
| 2. |
Install the clock spring and steering.
|
| 3. |
Install the upper and lower shroud.
|
| 4. |
Install the steering wheel.
|
 Components and components location
Component Location
1. Windshield wiper arm & blade
2. Wiper & washer switch
3. Windshield washer hose
4. Windshield wiper motor & linkage
...
 Front Wiper Motor Components and components location
Component Location
1. Cap
2. Nut
3. Wiper arm & blade
4. Rivet
5. Cowl top cover
6. Bolt
7. Wiper motor & linkage assembly
...
Other information:
Kia Cee'd JD Owners Manual: Using Audio CD Mode
Playing/Pausing CD Tracks
Once an audio CD is inserted, the
mode will automatically start and
begin playing.
While playing, press the button
to
pause and press button to play.
✽ NOTICE
Only genuine audio CDs are supported.
Other discs may result in
recognition failure (e.g ...
Kia Cee'd JD Service Manual: Special service tools
Special Service Tools
Tool(Number and Name)
Illustration
Use
09495-3K000
Band installer
Installation of ear type boot band
09495-33000
Puller
...

