Kia Rio: Ambient Temperature Sensor / Cluster Ionizer (FATC only)
Description and operation
| Description |
The cluster ionizer helps to clean up odors in the vehicle or from the air-conditioner system.
When the ignition switch ON, the inoizer runs a "CLEAN" mode and then a "ION" mode, switching every about 15 minutes.
In the “CLEAN” mode, the cluster ionizer generates negative and positive ions to help clean smells from the air
In the "ION" mode, the cluster generates negative ions and cleans inside air of a vehicle.
Repair procedures
| Inspection |
| 1. |
Press the MODE switch more then 4 times within 2 seconds while pressing the OFF switch.
* For diagnostic procedure, refer to DTC guide. |
| Replacement |
| 1. |
Disconnect the negative (-) battery terminal. |
| 2. |
Remove the front bumper. (Refer to Body - "Front Bumper Assembly") |
| 3. |
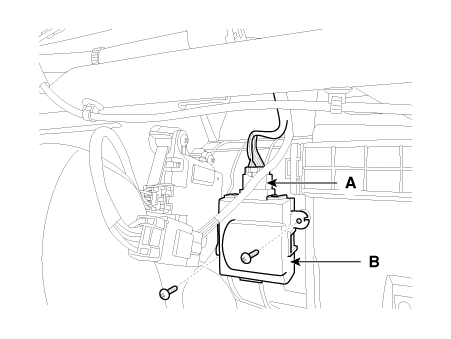
Disconnect the connector (A) and then remove the cluster ionizer (B) after loosening the mounting screws.
|
| 4. |
Installation is the reverse order of removal. |
 Auto Defogging Sensor (FATC only)
Description and operation
Description
The Auto Defogging Sensor is installed on front windshild glass. The Auto Defogging
Sensor senses moisture on the windshild. The air conditioner c ...
 Heater
...
Other information:
Kia Rio 2017-2020 YB Service Manual: Mode Control Actuator
Description and operation Description The mode control actuator is located at the heater unit. It adjusts position of mode door by operating mode control actuator based on signal of A/C control unit. Pressing mode select switch makes the mode control actuator shift in order of Ve ...
Kia Rio 2017-2020 YB Owners Manual: Stop and tail lamp / Side marker (Bulb type) replacement (for 4 door)
1. Open the trunk lid. 2. Remove the service cover by pulling out the service cover. 3. Remove the socket from the assembly by turning the socket counterclockwise until the tabs on the socket align with the slots on the assembly. 4. Remove the bulb from the socket by pressing it in and rota ...

