 Kia Rio: Console Replacement
Floor Console Replacement
| [M/T] |
| •
A plastic trim tool is recommended, but if prying with
a screwdriver, wrap it with protective tape, and apply protective
tape around the related parts, to prevent damage.
|
| •
Put on gloves to protect your hands.
|
|
1. |
Using a screwdriver or remover, remove the gear boots (A).

|
|
2. |
Using a screwdriver or remover, remove the console upper cover
(A).

|
|
3. |
Using a screwdriver or remover, remove the parking brake cover
(A).

|
|
4. |
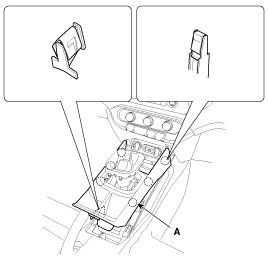
Remove the floor console pad (A).

|
|
5. |
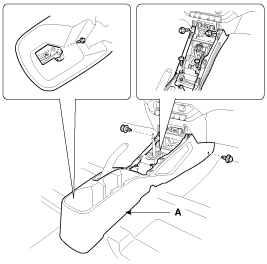
After loosening the mounting bolts and clips, then remove the
floor console assembly (A).

|
|
6. |
Installation is the reverse of removal.
|
|
•
Make sure the connector are connected in properly.
|
|
•
Replace any damage clips.
|
| [A/T] |
| •
A plastic trim tool is recommended, but if prying with
a screwdriver, wrap it with protective tape, and apply protective
tape around the related parts, to prevent damage.
|
| •
Put on gloves to protect your hands.
|
|
1. |
Using a screwdirver or remover, remove the gear boots (B) and
gear knob (A).

|
|
2. |
Using a screwdriver or remover, remove the console upper cover
(A).

|
|
3. |
Disconnect the connectors (A).

|
|
4. |
Using a screwdriver or remover, remove the parking brake cover
(A).

|
|
5. |
Remove the floor console pad (A).

|
|
6. |
After loosening the mounting bolts, screws, clips, then remove
the floor console assembly (A).

|
|
7. |
Installation is the reverse of removal.
|
|
•
Make sure the connectors are connected in properly.
|
|
•
Replace any damaged clips.
|
1 . Floor console assembly
2 . Console upper cover [M/T]
3 . Console upper cover [A/T]
4. Potable ash tray
5 . Parking brake cover
6 . Floor console pad
...
(1)
1 . Main crash pad assembly
2 . Crash pad side cover [LH]
3 . Crash pad side cover [RH]
4 . Fuse box cover
5 . Crash pad lower panel
6 . Knee bolster panel
7 . St ...
 Kia Rio: Console Replacement


 Console Components
 Crash Pad Components