Kia Rio Manuals Rio Car Manuals
Technical Info

Kia Rio: Inspection - Alternator - Charging System - Engine Electrical System - Kia Rio UB 2012-2020 Service ManualKia Rio: Inspection

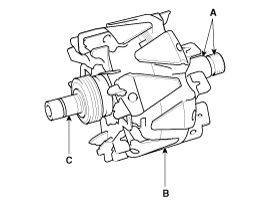
[Rotor]
1.
Check that there is continuity between the slip rings (C).


2.
Check that there is no continuity between the slip rings and the rotor (B) or rotor shaft (A).
3.
If the rotor fails either continuity check, replace the alternator.
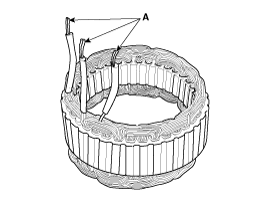
[Stator]
1.
Check that there is continuity between each pair of leads (A).


2.
Check that there is no continuity between each lead and the coil core.
3.
If the coil fails either continuity check, replace the alternator.
Drive belt tension measurement and adjustment
Belt tension measurement
Measure the belt tension using a mechanical tension gauge or a sonic tension meter.

Tension
[Without OAD]
New belt: 882.6 ~ 980.7N (90 ~ 100kg, 198.4 ~ 220.5lb)
Used belt: 637.4 ~ 735.5N (65 ~ 75kg, 143.3 ~ 165.3lb)
[With OAD]
New belt: 686.5 ~ 784.5N (70 ~ 80kg, 154.3 ~ 176.4lb)
Used belt: 490.3 ~ 588.4N (50 ~ 60kg, 110.2 ~ 132.3lb)


If the engine has run for 5 minutes or more, the belt tension must be adjusted as a used belt.
When installing the V-ribbed belt, all grooves on the pulley should be covered with belt ribs.
A loose belt causes slip noise.
Too tight belt cause bearing of alternator and water pump to damage.
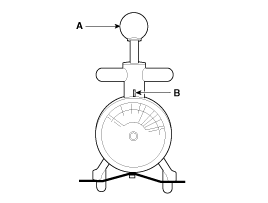
Using a mechanical tension gauge (BT-33-73F, BTG-2 type)
1.
While pressing the handle (A) of the gauge, insert the belt (B) between pulley and pulley (or idler) into the gap between spindle (C) and hook (D).


2.
After releasing the handle (A), read a value on the dial pointed by the indicator (B).


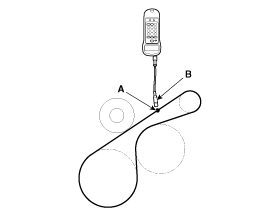
Using a sonic tension meter (U-505/507 type)
1.
Input the belt specifications into the tension meter.
Belt type
Location of measurement
Input data
M (Mass, g/m.rib)
W (Width, rib)
S (Span, mm)
With A/C
Crankshaft pulley to A/C compressor pulley
013.4
006.0
178.9
Without A/C
Idler to alternator pulley
013.4
006.0
Actual measurement value


Measurement of S (Span) : Caculate average value after measuring the distance 3~4 times.


D : Idler
d : Alternator pulley


2.
Locate the micro phone (B) close to the center of belt span (A) and bounce the belt by finger 2~3 times. Read a value on the display.
[With A/C]


[Without A/C]


If adjustment is necessary:
1.
Loosen the mounting bolts (A).
2.
Tighten the adjusting bolt(B) clockwise in loose tension ; loosen the bolt counterclockwise in high tension.


3.
Recheck tension of the belt.
4.
After adjusting tension, tighten the through bolts.

Tightening torque
12mm (0.47in) bolt :
19.6 ~ 26.5 Nm (2.0 ~ 2.7 kgf.m, 14.5 ~ 19.5 Ib-ft)
14mm (0.55in) bolt :
29.4 ~ 41.2 Nm (3.0 ~ 4.2 kgf.m, 21.7 ~ 30.4 Ib-ft)

Reassembly
1. Reassemble in the reverse order of disassembly.    • ...
DC DC Converter
...
See also:

Tire Wear
   • Using tires and wheel other than the recommended sizes could cause unusual handling ch ...

Inhibitor Switch Specifications
▷ Type: Combination of output signals from 4 terminals Power supply (V) 12 Output type Combination of output signals Signal Code Table ...

AGM Battery: Removal and Installation
1. Remove the battery. (1) Disconnect the battery terminals (A). Tightening torque (+ ...

Copyright © www.kiamanual.com 2020-2024 | Privacy Policy | Kia Car Parts