 Kia Rio: Power Door Lock Actuators Inspection
Front Door Lock Actuator and Switch
|
1. |
Remove the front door trim.
(Refer to the Body group - Front door)
|
|
2. |
Remove the front door latch.
(Refer to the Body group - Front door).
|
|
3. |
Disconnect the connectors from the actuator.

|
|
4. |
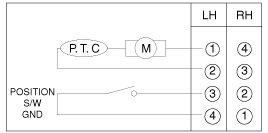
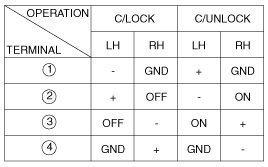
Check actuator operation by connecting power and ground according
to the table.
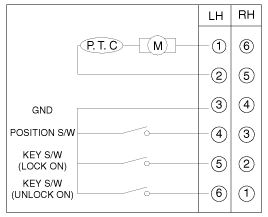
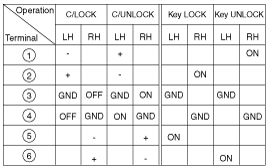
Check for continuity between the terminals in each switch position
when inserting the key into the door according to the table
To prevent damage to the actuator, apply battery voltage
only momentarily.
|
[Without key (4Pin)]


[With key (6Pin)]


Rear Door Lock Actuator and Switch
|
1. |
Remove the rear door trim.
(Refer to the Body group - Rear door)
|
|
2. |
Remove the rear door latch.
(Refer to the Body group - Rear door)
|
|
3. |
Disconnect the connectors from the actuator.

|
|
4. |
Check actuator operation by connecting power and ground according
to the table.
Check for continuity between the terminals in each switch position
when inserting the key into the door according to the table
To prevent damage to the actuator, apply battery voltage
only momentarily.
|


1. Driver power window switch
2. Door lock switch
3. BCM (Body Control Module)
4. Front door lock actuator
5. Rear door lock actuator
6. Internal junction box
...
Driver Door Lock Switch Inspection
1.
Disconnect the negative (-) battery terminal.
2.
Remove the front door trim panel.
(Refer to t ...
See also:
Specification
[AMS type (NON-OAD)]
Item
Specification
Rated voltage
13.5V, 90A
Speed in use
1,000 ~ 18,000 rpm
Voltage regulator
IC ...
Components Location
1. PCV valve
2. Canister
3. Purge control solenoid valve (PCSV)
4. Fuel tank pressure sensor (FTPS)
5. Canister close valve (CCV)
6. Fuel level sensor (FLS)
7. ORV ...
Cowl Top Cover Replacement
1.
Remove the wiper arm cover (B).
2.
After loosening the mounting nuts, then remove the wiper arm (A).
Tightening to ...
 Kia Rio: Power Door Lock Actuators Inspection


 Component Location
 Power Door Lock Switch Inspection