 Kia Rio: TJ Joint Replacement
| •
Special grease must be applied to the driveshaft joint.
Do not substitute with another type of grease.
|
| •
The boot band should be replaced with a new one.
|
|
1. |
Remove the Front Driveshaft. (Refer to DS group - “Front Driveshaft”)
|
|
2. |
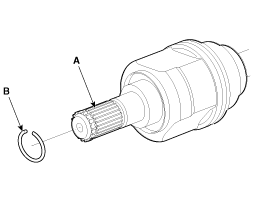
Remove the circlip (B) from the driveshaft spline (A).

|
|
3. |
Remove both boot bands from the TJ case.


|
|
4. |
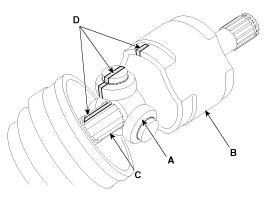
Remove the TJ case (A).

|
|
•
Make alignment marks on spider roller assembly
(A), joint case (B), and shaft spline (C) to aid reassembly.
|

|
5. |
Remove the snap ring (A) from the shaft.

|
|
6. |
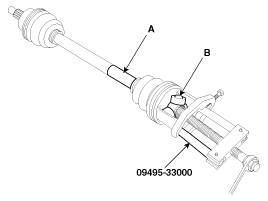
Remove the spider assembly (B) from the driveshaft (A) using the
special tool (09495-33000).

|
|
7. |
Clean the spider assembly.
|
|
8. |
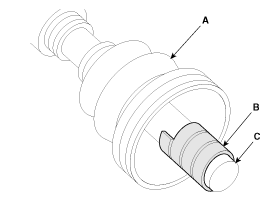
Remove the TJ boot (A).
|
|
•
For reusing the boot (A), wrap tape (B) around
the driveshaft splines (C) to protect the boot (A).
|

[LH]
1. BJ assembly
2. BJ circlip
3. BJ boot band
4. BJ boot
5. Shaft
6. TJ boot band
7. TJ boot
8. Spider assembly
9. Snap ring
10. TJ c ...
1.
Check the spider assembly for roller rotation, wear or corrosion.
2.
Check the groove inside the joint case for wear or corrosion
...
See also:
Hands free switch Schematic Diagrams
Circuit Diagram(1)
Circuit Diagram(2)
...
Flat tire
Jack and tools
The spare tire, jack, jack handle and wheel lug nut wrench are stored in the
luggage compartment.
Remove the luggage under tray out of the way to reach the equipment.
(1) Jack ha ...
Head Lamp Leveling Switch Removal
1.
Disconnect the negative (-) battery terminal.
2.
Remove the crash pad lower panel.
(Refer to the BD group - "Crash pad")
...
 Kia Rio: TJ Joint Replacement


 TJ Joint Components
 TJ Joint Inspection