Kia Rio: Power Door Locks / Power Door Lock Switch
Repair procedures
| • |
When removing with a flat-tip screwdriver or remover, wrap protective
tape around the tools to prevent damage to components.
|
| • |
When removing the interior trim pieces, use a plastic panel removal
tool not to damage the surface.
|
| • |
Be careful to store and handle the crash pad when removing/installing
because lubricant and oil can leave a stain on the trim.
|
|
| 1. |
Disconnect the negative (-) battery terminal.
|
| 2. |
Remove the crash pad center lower panel.
(Refer to Body - "Crash Pad Center Panel")
|
| 3. |
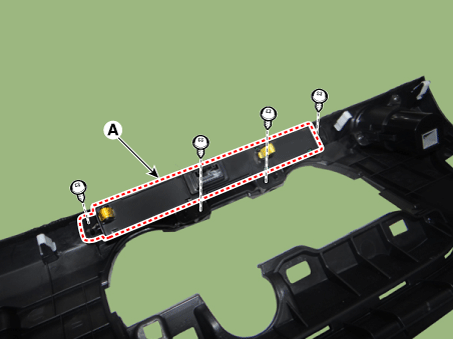
Remove the hazard warning lamp switch (A) after loosening the mounting
screws.

|
| 1. |
Install the hazard warning lamp switch.
|
| 2. |
Install the crash pad center lower panel.
|
| 3. |
Connect the negative (-) battery terminal.
|
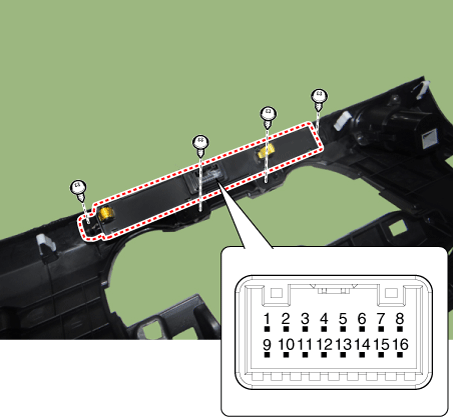
| 1. |
Check for continuity between the terminals. If there is an abnormality,
replace the switch.

No.
|
Description
|
No.
|
Description
|
1
|
Battery (+)
|
9
|
Illumination (+)
|
2
|
IGN1
|
10
|
-
|
3
|
PAB ON
|
11
|
PAB OFF
|
4
|
Rear center seat belt
|
12
|
Rear right seat belt
|
5
|
Passenger air bag
|
13
|
Rear left seat belt
|
6
|
Hazard mode
|
14
|
Door lock switch
|
7
|
-
|
15
|
Door lock indicator
|
8
|
Ground
|
16
|
Illumination (-)
|

|
Components and components location
Components
1. Door lock/unlock knob cable
2. Door latch assembly
Repair procedures
Inspection
...
Components and components location
Component Location
1. Power door mirror
2. Power door mirror switch
3. Power folding mirror switch
...
Other information:
Specifications
Specification
Air Conditioner
Item
Specification
Compressor
Type
DVE12
Oil type & Capacity
PAG 30, 120 ± 10 g
Displacement
122 cc/rev
...
Components and components location
Components
Schematic diagrams
Circuit Diagram
Description and operation
Description
Integrated Rain Sensor
Integrated rain sensor (A) controls three systems: front wiper, auto-light, and
central air c ...
 Power Door Lock Module
 Power Door Mirrors


