Kia Rio: Rear Seat Belt / Rear Seat Belt Retractor
Components and components location

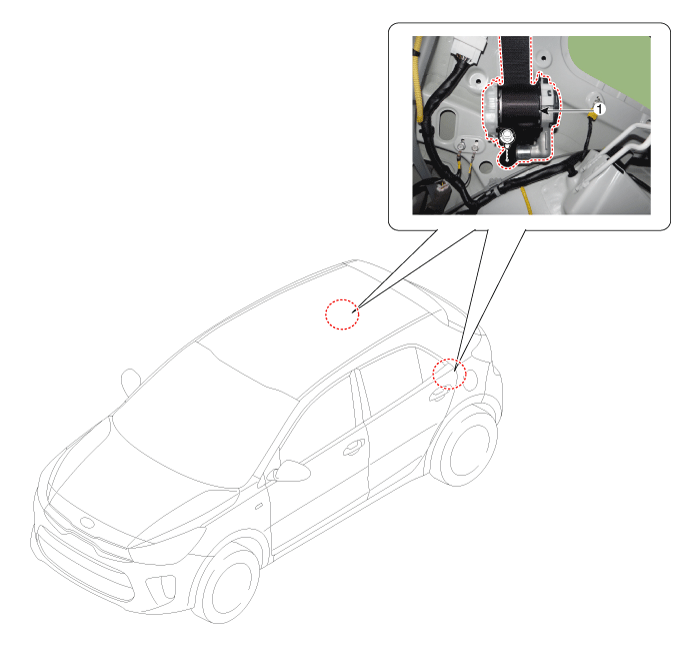
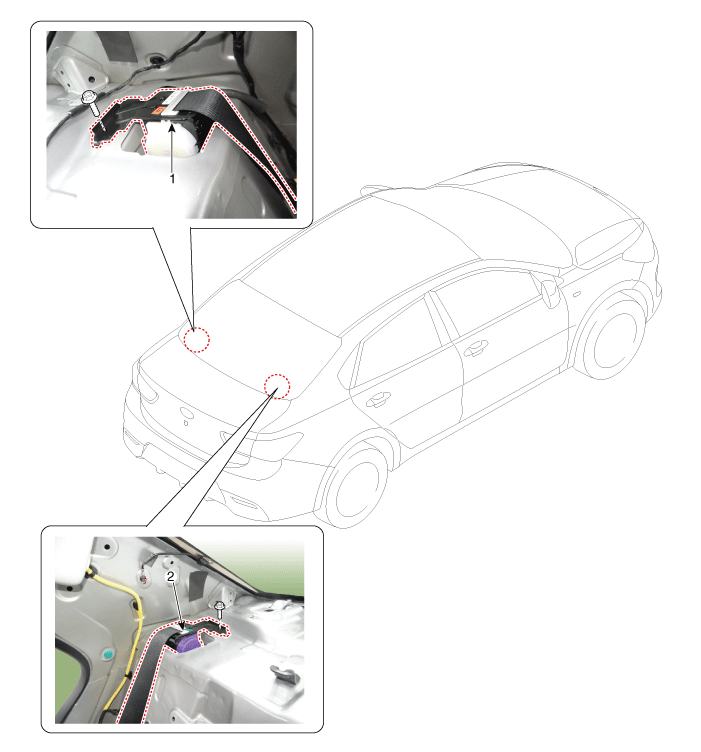
1. Rear seat belt retractor
|
|

1. Rear seat belt retractor [LH]
|
2. Rear seat belt retractor [RH]
|
Repair procedures
[5 Door]
|
Put on gloves to protect your hands.
|
| • |
Use a plastic panel removal tool to remove interior trim pieces
without marring the surface.
|
| • |
Take care not to bend or scratch the trim and panels.
|
| • |
When installing the belt, be careful not to damage the retractor.
|
|
|
When installing the belt, be careful not to damage the retractor.
|
| 1. |
Remove the rear pillar trim.
(Refer to Interior Trim - "Rear Pillar Trim")
|
| 2. |
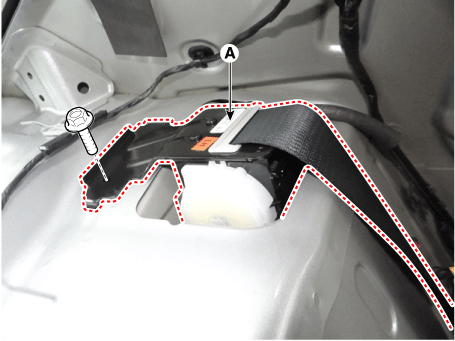
Remove the rear seat belt upper anchor (A) after loosening the mounting
bolts.
|
Tightening torque :
39.2 - 53.9 N·m (4.0 - 5.5 kgf·m, 28.8 - 39.8 lb·ft)
|

|
| 3. |
Disconnect the seat belt retractor connector (A).

|
| 4. |
Remove the rear seat belt retractor (A) after loosening the mounting
bolt.
|
Tightening torque :
39.2 - 53.9 N·m (4.0 - 5.5 kgf·m, 28.8 - 39.8 lb·ft)
|

|
| 5. |
Install in the reverse order of removal.
| •
|
Make sure the connector is plugged in properly.
|
| •
|
Replace any damaged clips (or pin-type retainers).
|
|
|
[4 Door]
|
Put on gloves to protect your hands.
|
| • |
Use a plastic panel removal tool to remove interior trim pieces
without marring the surface.
|
| • |
Take care not to bend or scratch the trim and panels.
|
| • |
When installing the belt, be careful not to damage the retractor.
|
|
|
When installing the belt, be careful not to damage the retractor.
|
| 1. |
Remove the rear seat assembly.
(Refer to Rear Seat - "Rear Seat Assembly")
|
| 2. |
Remove the rear pillar trim (A) by using a remover.

|
| 3. |
Remove the rear door scuff trim.

|
| 4. |
Remove the rear partition trim (A) after looseing the mountin screw.

|
| 5. |
Remove the rear wheel house trim (A) after looseing the mountin screw.

|
| 6. |
Remove the rear center seat belt cover (A).

|
| 7. |
Remove the rear package tray trim (A).

|
| 8. |
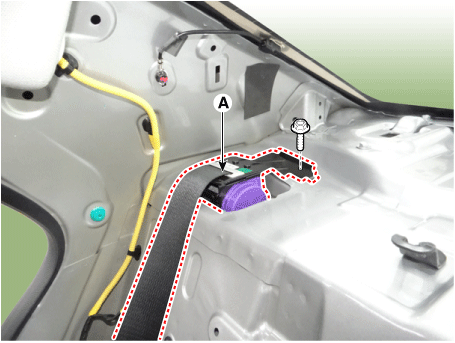
Remove the rear seat belt retractor (A) after loosening the mounting
bolt.
|
Tightening torque :
39.2 - 53.9 N·m (4.0 - 5.5 kgf·m, 28.8 - 39.8 lb·ft)
|
[LH]

[RH]

|
| 9. |
Install in the reverse order of removal.
| •
|
Make sure that the connector is connected properly.
|
| •
|
Replace any damage clips.
|
|
|
Components and components location
Component Location
[5 Door]
1. Rear center seat belt retractor
[4 Door]
1. ...
Other information:
Components and components location
Component Location
(4Door)
1. Trunk lid assembly
Repair procedures
Replacement
(4Door)
•
...
Manual transmission operation
The manual transmission has 6 forward gears.
This shift pattern is imprinted on the shift knob. The transmission is fully
synchronized in all forward gears so shifting to either a higher or a lower gear
is easily accomplished.
Depress the clutch pedal down full ...


 Rear Seat Belt
 Rear Center Seat Belt Retractor


