 Kia Rio: Compressor Disassembly
|
1. |
Remove the RH front tire.
(Refer to SS group - “Front Tire”)
|
|
2. |
Remove the engine room RH side under cover.
(Refer to EM group - “Engine and Transaxle Assembly”)
|
|
3. |
Separate the front portion of the front wheel guard (A) from the
wheel house.

|
|
4. |
Loosen the drive belt.
(Refer to EM group - “Timing Chain”)
|
|
5. |
Remove the center bolt (A) and the hub bolts (B) while holding
the pulley with a disc & hub assembly bolt remover (09977-25100).
Tightening torque :
15~21 N.m (1.5~2.1 kgf.m, 11.1~15.5 lb-ft)
|

|
|
6. |
Remove the hub assembly (A) and shim (gap washer) (B), taking
care not to lose the shim.

|
|
7. |
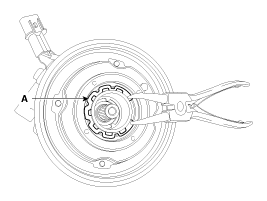
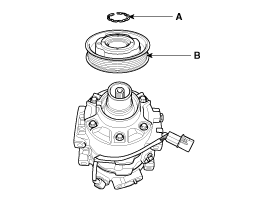
Remove the pulley (B) after removing the snap ring (A) with snap
ring pliers.
|
|
•
Be careful not to damage the pulley and compressor
during disassembly/reassembly.
|
|
•
Once snap ring is removed, replace it with a new
one.
|


|
8. |
Reassembly is the reverse order of disassembly.
|
|
•
Clean the pulley and compressor sliding surfaces
with non-petroleum solvent.
|
|
•
Install new snap ring, and make sure they are
fully seated in the groove.
|
|
•
Make sure that the pulley turns smoothly after
reassembly.
|
1.
Check the plated parts of the disc & hub assembly (A) for color
changes, peeling or other damage. If there is damage, replace the clutch
set.
...
1.
Check the condenser fins for clogging and damage. If clogged,
clean them with water, and blow them with compressed air. If bent, gently
bend them using a screwdrive ...
See also:
Overhead Console Lamp Inspection
Remove the overhead console lamp assembly then check for continuity between
terminals. If the continuity is not as specified, replace the overhead console
lamp assembly.
...
Smart key unit Inspection
Smart Key Unit
-
Refer to the BE group - inspection / self diagnosis with GDS.
Smart Key Switch
-
Refer to the BE group - inspection / self di ...
Inhibitor Switch Removal
1.
Place the shift lever into the "N" position.
2.
Remove the air cleaner assembly.
(1)
Remove t ...
 Kia Rio: Compressor Disassembly


 Compressor Inspection
 Condenser Inspection