 Kia Rio: Shift Lever Removal
| Shift Lever Assembly Replacement |
|
1. |
Remove the center console.
(Refer to "interior (console)" in BD group)
|
|
2. |
Disconnect the connector (A)
|
|
3. |
Remove the control cable (B).

|
|
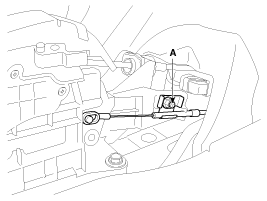
4. |
Remove the shift lock cable (A).
Tightening torque:
9.8 ~ 14.7 N.m (1.0 ~ 1.5 kgf.m, 7.2 ~ 10.8 lb-ft)
|

|
|
5. |
Remove the wiring clip (A).
|
|
6. |
Remove the AT lever(shift lever) assembly (B) by removing the
bolts (4ea).
Tightening torque:
8.8 ~ 13.7 N.m (0.9 ~ 1.4 kgf.m, 6.5 ~ 10.1 lb-ft)
|

|
|
7. |
Installation is the reverse of removal.
|
Adjust the shift lock cable.
(Refer to "adjustment shift lock cable" in this group)
| Control Cable Assembly Replacement |
|
1. |
Remove the center console.
(Refer to "interior (console)" in BD group)
|
|
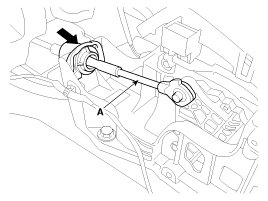
2. |
Remove the control cable (A).

|
|
3. |
Remove the crash pad.
(Refer to "Interior(Crash pad)" in BD group.)
|
|
4. |
Remove the heater unit.
(Refer to "Heater(Heater unit)" in HA group.)
|
|
5. |
Remove the retainer (A) and nuts (B).
Tightening torque:
9.8 ~ 14.7 N.m (1.0 ~ 1.5 kgf.m, 7.2 ~ 10.8 lb-ft)
|

|
|
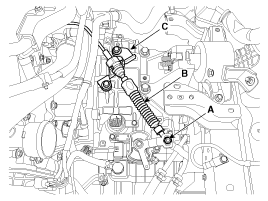
6. |
Remove the nut (A) from the manual control lever.
|
|
7. |
Remove the control cable (B) from the bracket (C) at transaxle
assembly side.
(Refer to "Automatic Transaxle" in this group)
Tightening torque:
9.8 ~ 14.7 N.m (1.0 ~ 1.5 kgf.m, 7.2 ~ 10.8 lb-ft)
|

|
|
8. |
Remove the control cable at cabin room.
|
|
9. |
Installation is the reverse of removal.
|
|
•
Set room side AT lever(shift lever) and automatic
transaxle side manual control lever to "N" position.
|
|
•
Control cable must be free unreasonable bending.
|
| Shift Lock Cable Replacement |
|
1. |
Remove the center console.
(Refer to "interior(console)"in BD group.
|
|
2. |
Remove the shift lock cable (A).
Tightening torque:
9.8 ~ 14.7 N.m (1.0 ~ 1.5 kgf.m, 7.2 ~ 10.8 lb-ft)
|

|
|
3. |
Remove the shift lock cable (B) from the brake pedal (A).

|
|
4. |
Installation is the reverse of removal.
Shift lock cable must be free unreasonable bending.
|
1. Shift lever knob
2. Shift lever assembly
3. Control cable
4. Shift lock cable assembly
5. Retainer
6. Brake pedal assembly
...
Adjusting the control cable
1.
Set room side AT lever(shift lever) and automatic transaxle side
manual control lever to "N" position.
...
See also:
Transaxle Control Module (TCM) Terminal Function
Connector [EGGG-AA]
Pin
Description
Pin
Description
22
Shift solenoid D (VFS-OD)
73
Inhibitor switch signal "S4"
...
Removal
Wiper and Washer Switch
1.
Disconnect the negative (-) battery terminal.
2.
Remove the steering wheel.
(Refer to the ST group - &qu ...
Description
Purge Control Solenoid Valve (PCSV) is installed on the surge tank and
controls the passage between the canister and the intake manifold. It is a solenoid
valve and is open when the ECM groun ...
 Kia Rio: Shift Lever Removal


 Shift Lever Components
 Shift Lever Adjustment