Kia Cee'd: Lighting System / Head Lamps Description and operation
| Description and Operation |
| 1. |
Bulb
| (1) |
Elements
Xenon gas: Xenon gas activates the initial reaction for rapid
illuminating.
Molybdenum electrode: anode arcing
Metal halide salts: color composing component
|
| (2) |
Lightening principle
When Xenon gas and metal halide salt will discharge the molybdenum
anode in a capsule, it emits light.
|
|
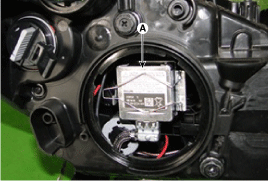
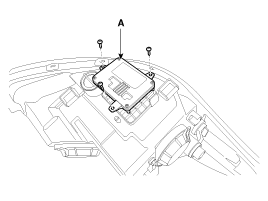
| 2. |
Ignitor
Ignitor (A) is an electromagnetic transformer that receives current
from ballast and boost voltage to light on the arc light source in any
environment.
|
| 3. |
Ballast
| (1) |
Ballast (A) delivers an instant high voltage pulse to the ignitor
electrode, to initialize discharge in the source.
|
| (2) |
Ballast supplies the stable power to the bulb and the ignitor
during initialization and normal state of arc.
|
|
| 4. |
Stability
| (1) |
Durable for vibration as there is no filament.
|
| (2) |
Does not operate if polarity are changed.
|
| (3) |
Doesn't operate if the input voltage is not in the range of
10-16V.
|
| (4) |
Doesn't operate if the circuit is short.
|
| (5) |
Doesn't operate if the bulb burnt out.
|
|
Component
1. Head lamp assembly lens &
housing
2. Head lamp low beam bulb
3. Turn signal lamp bulb
4. Position lamp bulb
5. Head lamp high ...
Inspection
1.
Check-points upon head lamp failure (HID)
(1)
Check the battery voltage. (Low beam will be on when the battery
v ...
Other information:
Kia Cee'd JD Owners Manual: Turn signal light
Follow the steps 1 to 7 from the previous
page.
8. Remove the socket from the assembly
by turning the socket counterclockwise
until the tabs on the socket align with
the slots on the assembly.
9. Remove the bulb from the socket by
pressing it in and rotating it counterclockwise
until ...
Kia Cee'd JD Service Manual: Curtain Airbag (CAB) Module Repair procedures
Removal
1.
Disconnect the battery negative cable and wait for at least thirty seconds
before beginning work.
2.
Remove the roof trim assembly.
(Refer to Body - "Roof trim assembly")
3.
...
 Head Lamps Components and components location
 Head Lamps Repair procedures