Kia Cee'd: Tail Gate / Tail Gate Trim Repair procedures
Kia Cee'd JD Service Manual / Body (Interior and Exterior) / Tail Gate / Tail Gate Trim Repair procedures
| Replacement |
|

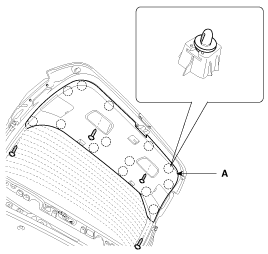
[Tail gate trim]
| 1. |
After loosening the mounting screws, then remove the tail gate trim
(A).
|
| 2. |
Install in the reverse order of removal.
|

[Tail gate upper trim]
| 1. |
Using a screwdriver or remover, remove the tail gate upper trim (A).
|
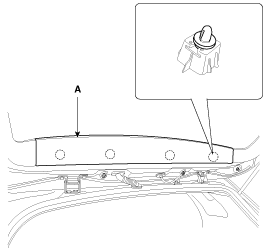
| 2. |
Install in the reverse order of removal.
|
[Tail gate side trim]
| 1. |
Remove the tail gate trim.
|
| 2. |
Remove the tail gate upper trim.
|
| 3. |
After loosening the mounting screws, then remove the tail gate side
trim (A).
|
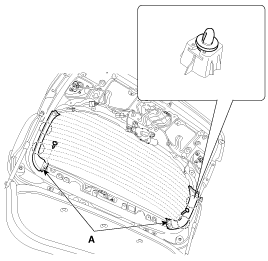
| 4. |
Install in the reverse order of removal.
|
 Tail Gate Trim Components and components location
Component Location
1. Tail gate trim
...
 Tail Gate Latch Components and components location
Component Location
1. Tail gate latch assembly
...
Other information:
Kia Cee'd JD Service Manual: Components and components location
Components [LHD]
1. Driver Airbag (DAB)
2. Steering Wheel
3. Clock Spring
4. Seat Belt Pretensioner (BPT)
5. Side Impact Sensor (SIS)
6. Side Airbag (SAB)
7. Passenger Airbag (PAB)
8. Front Impact Sensor
(FIS)
9. Curtain Ai ...
Kia Cee'd JD Service Manual: Repair procedures
Replacement
1.
Loosen the wheel nuts slightly.
Raise the vehicle, and make sure it is securely supported.
2.
Remove the front wheel and tire (A) from front hub .
Tightening torque:
88.2 ...