 Kia Rio: Rear combination lamp Removal
| Rear combination lamp (Inside) |
[4 Door]
|
1. |
Disconnect the negative (-) battery terminal.
|
|
2. |
Remove the trunk trim.
(Refer to the BD group - "Trunk")
|
|
3. |
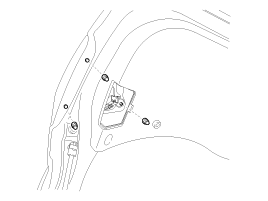
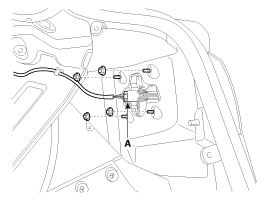
Remove rear combination lamp after removing the mounting nuts
(4EA) and disconnecting the connector (A).

|
|
4. |
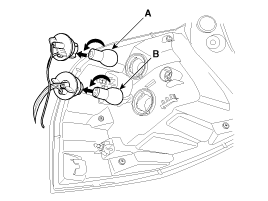
Remove the tail lamp bulb (A) and backup lamp bulb (B) after turning
in the counterclockwise direction.

|
|
5. |
If necessay to remove the bulb, remove the bulb after removing
the trunk trim
|
[5 Door]
|
1. |
Disconnect the negative (-) battery terminal.
|
|
2. |
Remove the lamp cover (A).

|
|
3. |
Remove rear combination lamp after removing the mounting nuts
(3EA) and disconnecting the connector (A).


|
|
4. |
Remove the tail lamp bulb (A) and backup lamp bulb (B) after turning
in the counterclockwise direction.

|
|
5. |
If necessay to remove the bulb, remove the bulb after removing
the lamp cover.
|
| Rear combination lamp (Outside) |
[4 Door]
|
1. |
Disconnect the negative (-) battery terminal.
|
|
2. |
Remove rear combination lamp after removing the mounting nuts
(4EA) and disconnecting the connector (A).

|
|
3. |
Remove the turn signal lamp bulb (A) and tail/ stop lamp bulb
(B) after turning in the counterclockwise direction.

|
|
4. |
If necessary to remove the bulb, remove the bulb after pulling
the trim cover aside.
|
[5 Door]
|
1. |
Disconnect the negative (-) battery terminal.
|
|
2. |
Remove the rear combination lamp (A) after removing the mounting
screws.

|
|
3. |
Disconnect the rear combination lamp connector (A).

|
|
4. |
Remove the turn signal lamp bulb (A) and tail/ stop lamp bulb
(B) after turning in the counterclockwise direction.

|
|
5. |
If necessary to remove the bulb, remove the bulb after pulling
the trim cover aside.
|
[4 Door]
1.
Install the high mounted stop lamp assembly.
2.
Install the package tray trim.
3.
Connect the n ...
Rear combination lamp (Inside)
[4 Door]
1.
Install the rear combination lamp assembly.
2.
Connect the rear combination connecto ...
See also:
Description
The starting system includes the battery, starter, solenoid switch, ignition
switch, inhibitor switch (A/T), clutch pedal switch (M/T), ignition lock switch,
connection wires and the battery ...
Sirius radio
Using SIRIUS Satellite Radio
Your Kia vehicle is equipped with a 3 month complimentary period of SIRIUS Satellite
Radio so you have access to over 130 channels of music, information, and entertainm ...
Control System Composition
Fault Diagnosis
Features a fail-safe mechanism that prevents dangerous situations from
developing in the event of a transaxle failure. The limp home mode engages if
the transaxle malf ...
 Kia Rio: Rear combination lamp Removal


 High Mounted stop lamp Installation
 Rear combination lamp Installation