 Kia Rio: Reassembly
| •
Thoroughly clean all parts to be assembled.
|
| •
Before installing the parts, apply fresh engine oil to
all sliding and rotating surface.
|
| •
Replace oil seals with new ones.
|
|
1. |
Install the valves.
|
|
(1) |
Install the spring seats.
|
|
(2) |
Using the SST (09222 - 2B100), push in a new oil seal.
Do not reuse old valve stem oil seals.
Incorrect installation of the seal could result
in oil leakage past the valve guides.
|
Intake valve stem seals are different from exhaust
ones in type. Do not reassembly ones in the other's
places.
|
(3) |
Install the valve, valve spring and spring retainer, after
applying engine oil at the end of each valve.
When installing valve springs, the enamel coated
side should face the valve spring retainer.
|
|
2. |
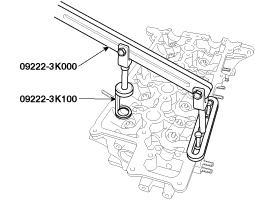
Using the SST(09222 - 3K000, 09222 - 3K100), compress the spring
and install the retainer locks.
After installing the valves, ensure that the retainer locks are
correctly in place before releasing the valve spring compressor.

When installing the SST, use the torque, 1.2kgf.m or less.
|
|
3. |
Lightly tap the end of each valve stem two or three times with
the wooden handle of a hammer to ensure proper seating of the valve
and retainer lock.
|
|
4. |
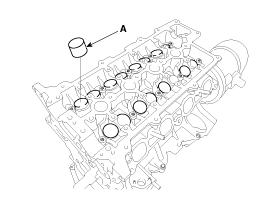
Install the MLA(Mechanical lash adjuster)s.
Check that the MLA (A) rotates smoothly by hand.

All the MLAs should be installed in its original position.
|
Cylinder Head
1.
Inspect for flatness.
Using a precision straight edge and feeler gauge, measure the
surface the contacting the cylinder block and the manifolds ...
•
Thoroughly clean all parts to be assembled.
•
...
See also:
5Door Interior
...
Relay Box (Engine Compartment) Inspection
Replacement of EMS box
1.
Disconnect the negative (-) battery terminal.
2.
Push hooks in the engine room relay box out to the arrow directio ...
Disassembly
1.
Remove the rear cover (A) after removing nuts.
2.
Remove the mounting bolts (A) and the brush holder assembly (B).
...
 Kia Rio: Reassembly


 Inspection
 Installation