Kia Cee'd: Heater / Evaporator Core Repair procedures
| 1. |
Disconnect the negative (-) battery terminal.
|
| 2. |
Remove the heater & blower assembly.
(Refer to Heater - "Heater Unit")
|
| 3. |
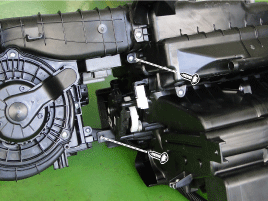
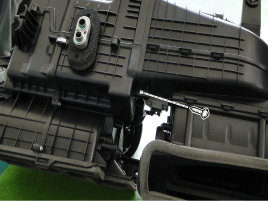
Separate the blower unit from the heater unit after loosening 3 screws.


|
| 4. |
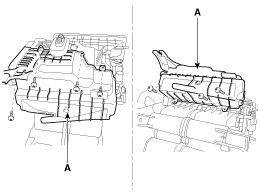
Remove the heater unit lower case (A) after loosening the mounting screws.

|
| 5. |
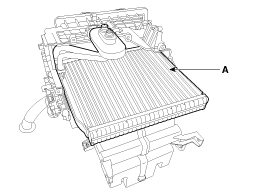
Pull out the evaporator core (A) from heater unit.

| •
|
Be careful that the inlet and outlet pipe are not bent
during heater core and evaporator core removal/installation.
|
|
|
| 6. |
Installation is the reverse order of removal.
| • |
If you're installing a new evaporator, add refrigerant oil (PAG
OIL).
|
| • |
Replace the O-rings with new ones at each fitting, and apply
a thin coat of refrigerant oil before installing them. Be sure
to use the right O-rings for R-134a or R-1234yf to avoid leakage.
|
| • |
Immediately after using the oil, replace the cap on the container,
and seal it to avoid moisture absorption.
|
| • |
Do not spill the refrigerant oil on the vehicle; it may damage
the paint; if the refrigerant oil contacts the paint, wash it
off immediately
|
| • |
Apply sealant to the grommets.
|
| • |
Make sure that there is no air leakage.
|
| • |
Charge the system and test its performance.
|
| • |
Do not interchange the inlet and outlet heater hoses and install
the hose clamps securely.
|
| • |
Refill the cooling system with engine coolant
|
|
Replacement
1.
Disconnect the negative (-) battery terminal.
2.
Remove the heater & blower assembly.
(Refer to Heater - &q ...
Description
The heater unit includes mode control actuator and temperature control actuator.
The temperature control actuator is located at the heater unit. It regulates
the t ...
 Heater Core Repair procedures
 Temperature Control Actuator Description and operation


